This article is divided into two parts:
A. The technical aspects of email deliverability.
B. How to craft words and emails that drive people to take action.
Enjoy!
Marketing is a competition for attention—the attention of your prospects.
Your audience is speeding down a highway of information, and your job is to make your billboard the one that gets them to take the next exit.
Two things will determine the impact:
The location of your billboard and the message on it.
In business, it’s all about location, location, location. In the digital world, there’s no better “location” than someone’s inbox.
It’s intimate, personal, and uniquely powerful. An email can sit right next to a message from their lawyer, their kid’s school, or even the county clerk—and look just like any other important message.
And that unique intimacy with your prospect? It can be scaled to millions, simply by growing your lists.
What other marketing method can do that?
Think email marketing is dead? Let me ask you: how many times have you checked your inbox today?
Cold emails work—I know because we handle cold email marketing for B2B and B2C businesses across the board. I also know it because I am, myself, a recipient of cold emails (and I’m sure you are too), and I can tell you that some of them do work on me. I’ve built real relationships and done real business with people who first reached out through a cold email.
And I’m not alone. Research shows that the average cold email response rate is around 8.5%, and top-performing campaigns can see reply rates of over 20% (Hunter.io, Quickmail.com). When done right, cold emails are more than just a shot in the dark—they’re a proven strategy to start meaningful business conversations.
But here’s the catch: I only open cold emails when two conditions are met:
They’re in my inbox (not buried in spam).
They speak to something I care about at that moment.
And this is exactly why we created this guide—to show you how to land in the right inbox with the right message.
Whether you’re trying to master deliverability or craft emails that make people pause and respond, this guide is your blueprint for making cold emails work for your business.
I hope you’ll enjoy this guide!
Joshua Leavitt
Omni Online Strategies
Part 1: Mastering Email Deliverability
In the first part, we’ll break down the technical essentials of ensuring your cold emails consistently land in the inbox of your B2B leads. From choosing the right bulk-emailing app to establishing a strong IP reputation, we’ll guide you step-by-step. You’ll learn how to warm up your email accounts, calculate quotas, and scale your sending volume strategically, reaching up to 10,000 emails per day without compromising deliverability. With actionable tips and recommended tools, this section provides a clear framework to help you optimize email performance and expand your reach confidently.
Part 2: Crafting Emails That Drive Action
The second part shifts focus to the art of communication. Landing in the inbox is just the beginning—this section explores how to create emails that truly connect and convert. We’ll cover the psychology of sales, emphasizing the importance of understanding your prospects’ challenges and needs. You’ll discover how to segment your audience, build personalized funnels, and craft messages that resonate with each group. We’ll also dive into the power of empathy, storytelling, credibility, and social proof in creating impactful sales emails. This section equips you with the strategies to build trust, foster engagement, and inspire action.
Together, these two parts form a complete guide to cold email success, balancing technical precision with the art of effective communication.
Factors Considered When Building Your Cold Email System
Bulk-emailing app necessary features and user experience:
Choosing the right platform is crucial for successful cold email campaigns. That is why we recommend Omnily.io. Omnily is more than just a tool for high deliverability and managing multiple domains—it’s a complete ecosystem for cold and warm email outreach, designed to take leads from the first touchpoint to conversion. With Omnily.io, you’re not just sending emails; you’re managing an entire customer journey within one tool.
Utilizing multiple senders for higher email volumes:
To achieve significant daily email volume, Omnily.io supports campaigns that leverage multiple senders. Each sender corresponds to an email account with a specific domain, such as john@yourcompany.com, john@your-company.com, or john@yourcompany.us. By distributing emails across different senders, you can avoid daily quota limits and improve overall deliverability.
Managing the “warm” part of the journey in one tool:
What sets Omnily.io apart is its ability to seamlessly manage the transition from cold outreach to nurturing relationships. Once leads start engaging, you can handle everything in one platform—email automation, SMS, phone calls, chat, calendar scheduling, landing pages, and even full CRM functionality. This unified approach eliminates the need for multiple disconnected tools and ensures a consistent, efficient process for turning cold prospects into warm, paying clients.
Warming up each sender and building IP reputation:
While Omnily.io does not include automated warm-up features, it integrates seamlessly with third-party tools for sender warm-up and IP reputation building. Gradually increasing email volume and adhering to best practices for sender reputation are essential steps that Omnily.io supports through actionable guidance and integrations.
Email Quota Calculation
To ensure effective email sending, we recommend calculating the daily quota for each sender. In this example, we will consider using Google Workspace (formerly G Suite) as the email account provider:
Google Workspace allows for higher email sending limits, with over 2,000 emails per day for paid services.
To have senders with your company domain, the regular Gmail option is not suitable.
Considering a daily target of 10,000 emails, we recommend using Google Workspace and setting the quota at 2,000 emails per day per sender.
By utilizing five senders with a quota of 2,000 emails per day each, you can achieve the desired volume of 10,000 emails per day.
Sender Warm-up Plan
To ensure a successful warm-up process and maintain a positive sender reputation, we recommend following a gradual sending plan. The recommended plan is as follows:
Day 1 to day 14: warm up only
Day 14: Send 20 emails per day per sender.
Day 15: Increase to 40 emails per day per sender.
Day 16: Increase to 80 emails per day per sender.
Day 17: Increase to 160 emails per day per sender.
Day 18: Increase to 320 emails per day per sender.
Day 19: Increase to 700 emails per day per sender.
Day 20: Increase to 1,500 emails per day per sender.
Day 21: Increase to 2,000 emails per day per sender.
By gradually increasing the email volume, you can minimize the risk of triggering any flags or bounces, and build a positive sender reputation over time.
Workflow for Setting up the Cold Emailing System
To implement the proposed cold-emailing system effectively, the following workflow is recommended:
Google Domains:
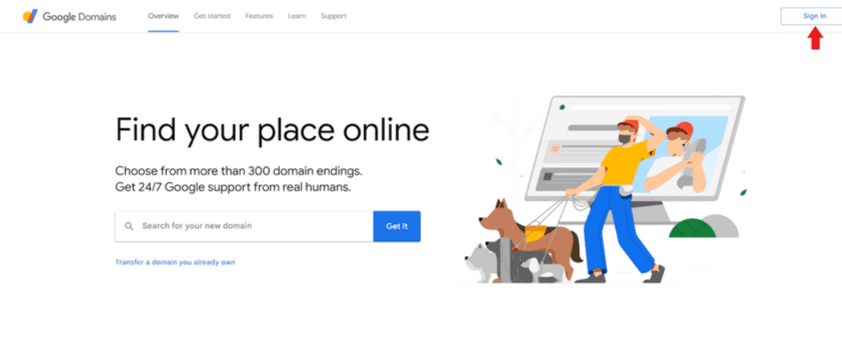
Visit the Google Domains website (https://domains.google/) and log in to your account.
Upon login, you will be redirected to the Google Domains page.
Search for and select five domains that are similar to your company’s domain but slightly different.
Add the selected domains to your cart and proceed to the checkout page.
Provide the necessary contact information and select your preferred payment method.
Complete the purchase, and you will see the list of domains purchased on your page.
Godaddy:
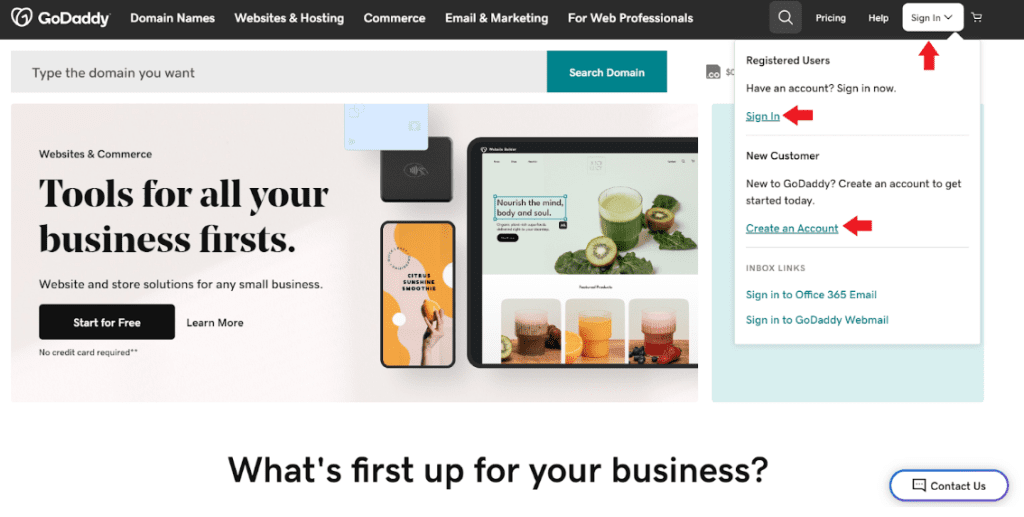
Go to the GoDaddy website(https://www.godaddy.com/) and click the “Sign In” button then click either the “Sign In” link to login to your account or click the “Create an Account” to sign up for a new one.
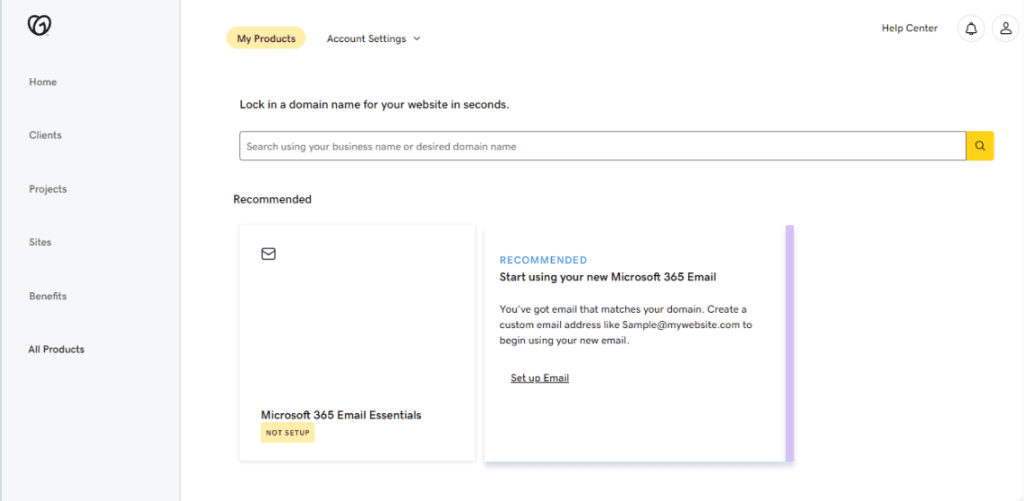
After logging in, click on the “All Products” option from the menu. Then click “Set Up Email Link”.
Once redirected, There will be a page that will ask for domains. Click on the radio button that shows “A domain not in my Godaddy account” then add the domain name you purchased from Google Domains then click on the “Continue” button to add them to Godaddy.
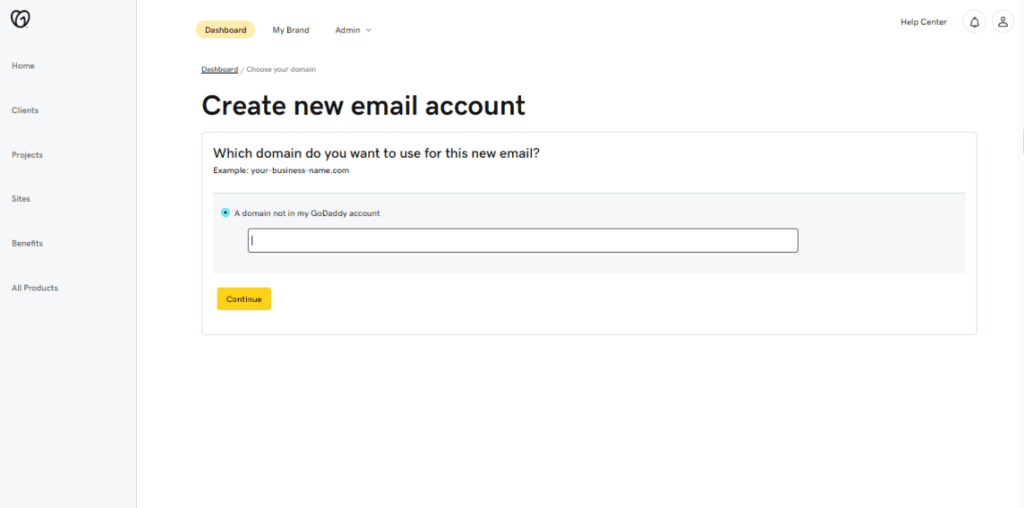
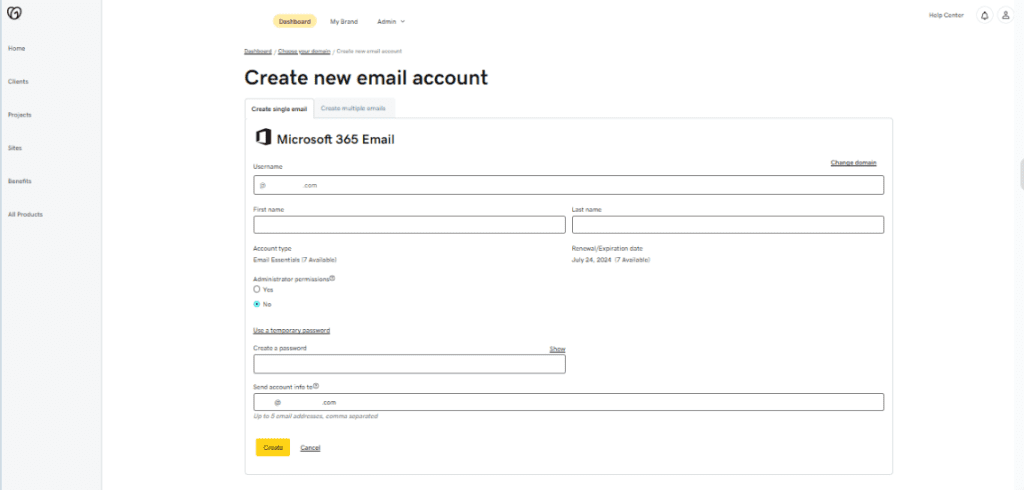
After adding a domain, it will redirect you to an email account creation. You can either create a single email or multiple emails. Provide the required user details and customize the preferred settings for each mailbox.
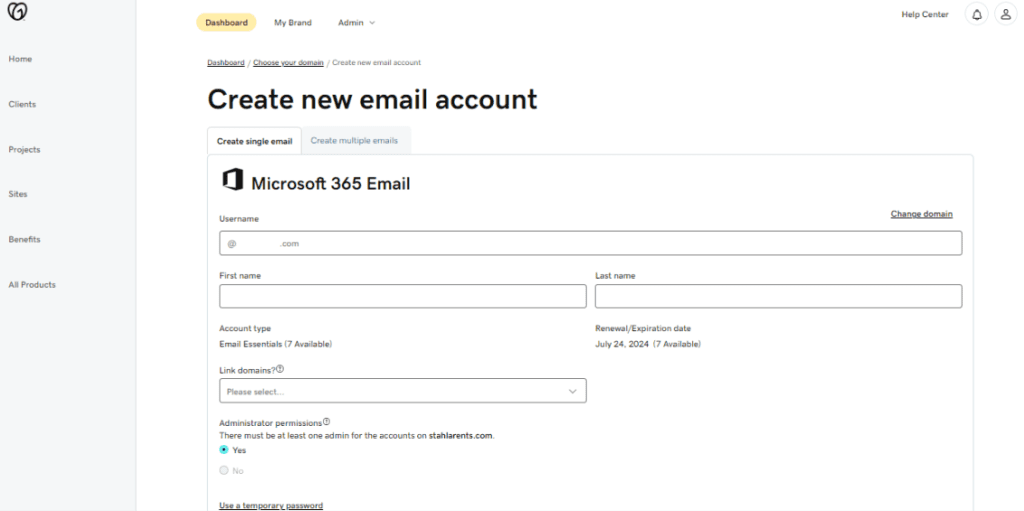
Click the “Create” or “Create Account” button to create the mailboxes.
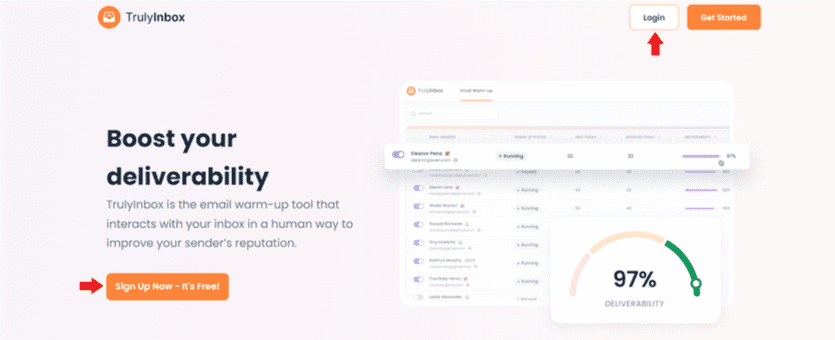
Trulyinbox (Warm-up):
Visit the Trulyinbox website (https://www.trulyinbox.com/) and log in to your account or sign up to create a new one.
On click, a dialog will be shown with options of the mail service you have used. Click on the preferred mail service to connect emails.
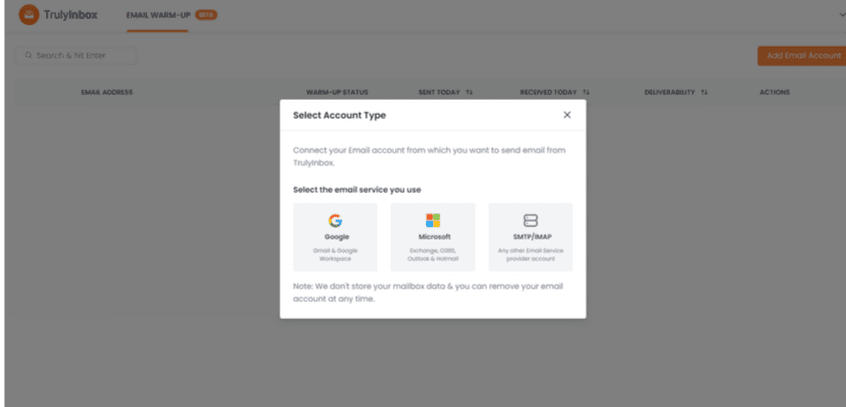
If Google or STMP/IMAP option is chosen, add the email details and test the connections by clicking “Test SMTP Connection” button for SMTP and “Test IMAP Connection” button for IMAP before clicking “Connect & Save Button”.
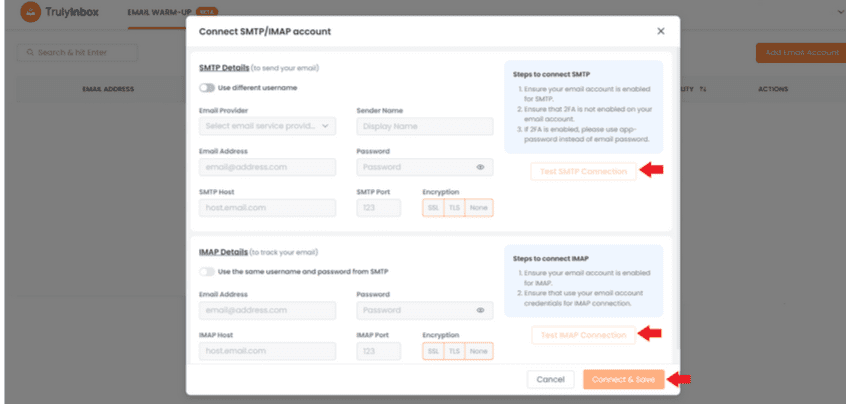
If Microsoft 365 is chosen, there will be a dialog box to ask you to access your email servers and automatically connect to TrulyInbox.
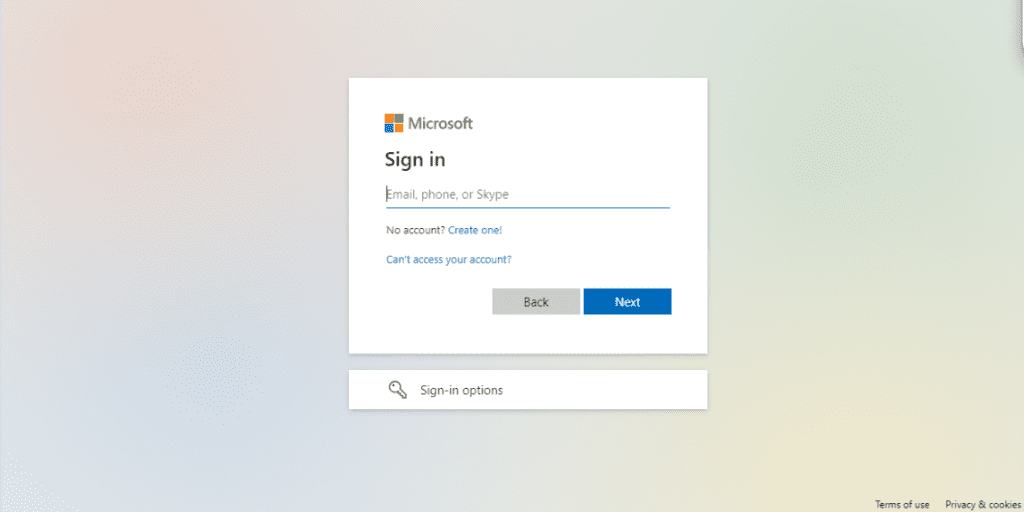
Warm-up Phase:
During the warm-up phase, gradually increase the number of emails sent per day per sender following the recommended plan outlined above.
Warm up the domains for a period of 14 days, ensuring careful and gradual volume increase to maintain sender reputation and deliverability.
Disconnecting from Godaddy and Connecting to Google Workspace after the Warmup Phase
Google Workspace:
Go to the Google Workspace website (https://workspace.google.com) and log in to your account.
From the homepage, access the Admin Console by clicking the “Admin console” button.
In the Admin Console, navigate to the “Users” section and click on the “Manage” option.
Add new users by clicking the “Add new user” option and enter the email details for each warmed-up domain.
Click “Add New User” to create the email users in Google Workspace.
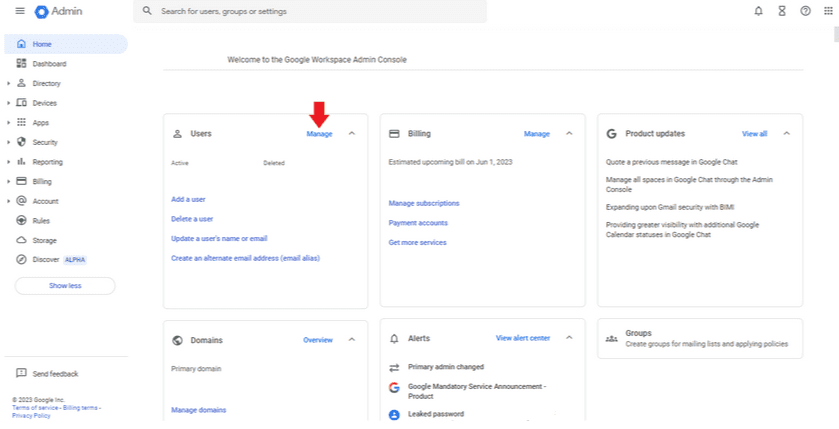
Saleshandy:
Go to the Saleshandy website and log in to your account. If you don’t have an account, create one.
Once logged in, click on the settings icon (⚙️) and select “Email Accounts.”
Click on the “Add Email Accounts” button and choose the preferred mail service.
If SMTP/IMAP is selected, provide the email details for each Google Workspace email account and test the connections.
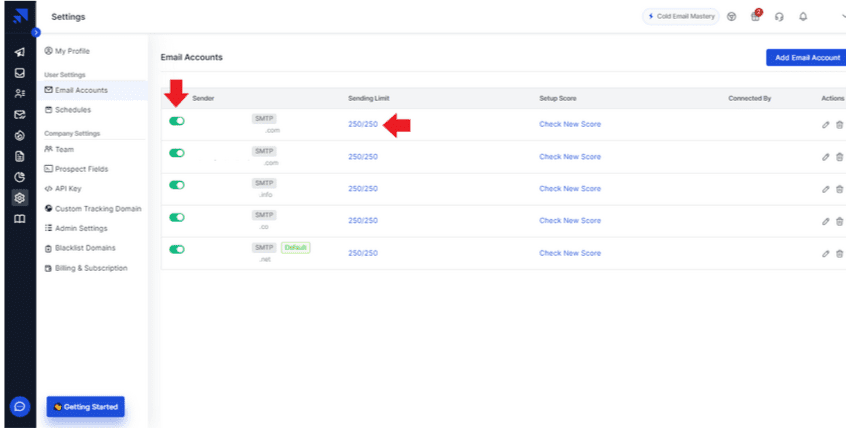
Save the email accounts and turn on the switch for each email account to be used.
Adjust the sending limit for each email account to match the warmed-up domain’s quota.
Save the settings.
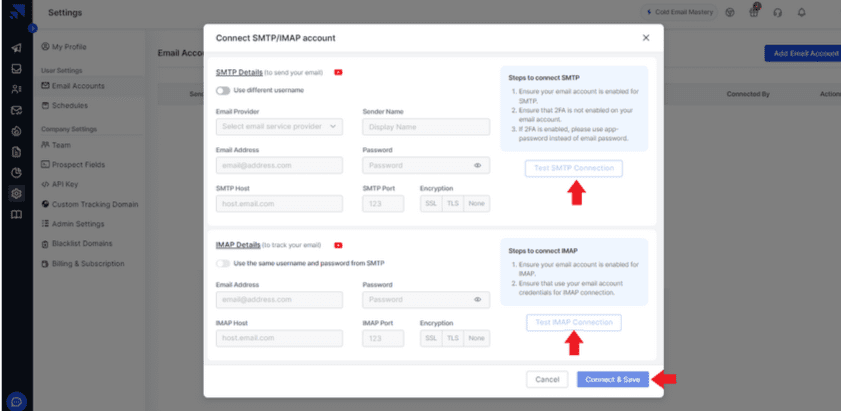
High deliverability is just the beginning—landing in the inbox gets your email seen, but it’s what happens next that determines success. The real challenge isn’t just reaching your recipients; it’s connecting with them in a way that makes them respond.
The secret? Know who you’re speaking to and be relevant.
No billboard on Florida’s Turnpike advertises paragliding in Cape Town, South Africa. Why? Because it’s not relevant. Your audience needs to see something that makes sense for them, something they care about. That starts with your database. Work on making your lists a group of people who genuinely need what you have to offer. Then, craft the message that drives that point home.
Who are your recipients? What challenges are they navigating? What outcomes are they working toward? The moment you show that you truly understand their world, you start to build trust. This isn’t about pushing a product or service; it’s about positioning yourself as someone who can help with their problems.
Relevance is the hook. Think about it—you’re still reading this article because something in my words caught your attention. They resonated, addressed something you were curious about, or offered value you wanted. That’s the code you need to crack in your emails. It’s a rhythm, a natural flow that keeps people reading, like a good joke at the bar, a great movie plot, or a story that holds your attention. Every effective dialogue—whether in person or in an email—follows that rhythm and keeps people engaged.
Crafting that rhythm in your emails means speaking directly to your recipient’s needs, interests, and pain points in a way that feels natural and valuable. It’s not about clever gimmicks; it’s about connection. When your emails deliver trust and relevance, they don’t just get opened—they get read, understood, and acted upon.
That’s the real goal of any successful cold email campaign.
Psychological Impact of Sales
What drives people to make decisions?
Is it fear? Love? Survival instincts? Or maybe it’s how they want to be perceived—a desire to be seen as successful, innovative, or ahead of the curve?
Why are your open rates low? Maybe your words left them indifferent. And indifference? It’s a relationship killer. Make yourself more interesting. Sales aren’t just about logic; they’re about access—access to the emotions that steer decisions. Maybe your prospect is driven by the fear of missing out, the promise of security, or the dream of achieving something bigger. Your job is to uncover that spark and speak to it. Like a screenwriter crafting a story that hooks its audience.
The key is empathy. Not the vague kind of empathy people throw around, but the real art of absorbing someone else’s perspective—seeing the world as they do. The Greek philosophers said, “Know thyself.” For us, it’s “Know thy audience.” What keeps them up at night? What makes them tick?
When your email connects to their emotional drivers, it’s no longer just another message in their inbox. It’s a reason to pause. A reason to engage.
Write your emails to connect on this level, and you won’t just sell—you’ll create something lasting. Something meaningful.
Personalization and Segmentation
Sending a uniform message to your entire email list overlooks the diverse challenges, goals, and interests of your recipients. A one-size-fits-all approach dilutes your impact and reduces engagement rates, ultimately hindering the success of your campaigns.
Segmentation allows you to categorize your audience into distinct groups based on criteria such as industry, job title, geographic location, or specific pain points. By understanding these segments, you can craft targeted messaging that addresses their unique needs, making your emails more relevant and impactful.
This approach goes beyond personalization—it creates a tailored journey for each group. Segmentation enables you to build email funnels that guide recipients through a process that feels curated for them, increasing the likelihood of engagement and conversion. For example, a CEO may respond to strategic insights, while a marketing manager may prioritize actionable tactics.
For technical execution, segmentation also improves key performance metrics such as open rates, click-through rates, and overall deliverability. Highly targeted content signals to email service providers that your emails are relevant, which in turn helps maintain a positive sender reputation.
Check out our resource, “300 Different High-Converting Cold Email Subject Lines for Various Industries,” to explore how segmented subject lines can enhance your campaigns. By segmenting your audience and delivering precise, data-driven content, you’ll not only resonate with your recipients but also position yourself as a trusted and valuable resource in their inbox.
Storytelling
Storytelling is an indispensable strategy in cold email marketing, but it needs to be actionable and purposeful to deliver results. Instead of overwhelming recipients with product-centric pitches, structure your emails around a clear, relatable narrative that connects directly to their needs and goals.
Here’s how to make your storytelling effective:
Start with a real-world scenario: Open with a specific situation or challenge that mirrors what your prospects might be experiencing. For example: “Last year, a growing e-commerce business faced a 30% cart abandonment rate, putting revenue growth at risk.”
Introduce your solution through the lens of the prospect: Position your product or service as the guide in the story, not the hero. Continue: “By implementing a tailored email follow-up system, they recovered over $500,000 in revenue within six months.”
Highlight tangible outcomes: Use data, testimonials, or clear before-and-after comparisons to demonstrate impact. Include statements like: “Their cart recovery emails achieved a 35% open rate and a 25% conversion rate—helping them scale faster without additional ad spend.”
Focus on the prospect’s transformation: Keep the narrative centered on the recipient’s potential success, not just your product’s features. Ask a question like: “Could your business achieve similar results with a streamlined email strategy?”
End with a clear call-to-action: Guide the recipient to the next step. For example: “Schedule a quick 15-minute call to see how we can tailor a solution for your needs.”
Building Credibility and Social Proof
Building trust demands tangible proof that your product or service delivers real value. Even the best-crafted cold email will deliver better results if your business has a strong online reputation to back it up. When prospects research you—and they will—a solid presence across trusted platforms can make all the difference.
Here’s how to build and leverage your online reputation:
Google My Business: Ensure your profile is fully optimized with accurate details, reviews, and photos. Positive reviews on Google establish credibility and are often the first thing prospects check.
Clutch and Other Review Sites: If you’re in B2B, platforms like Clutch, Trustpilot, or G2 are key for showcasing verified testimonials and industry recognition.
Directories: List your business in relevant industry directories and ensure your information is consistent across platforms. This enhances visibility and credibility.
Social Media Reviews: Maintain an active presence on platforms like Facebook, Instagram, or LinkedIn. Positive reviews and engaged followers reflect a trustworthy and well-regarded brand.
Case Studies on Your Website: Create dedicated pages for client success stories. A clear, professional presentation of your wins reinforces confidence in your capabilities.
Awards and Certifications: Highlight industry awards, certifications, or partnerships prominently. These are instant trust builders for anyone researching your business.
Third-Party Media Mentions: Feature any notable mentions of your brand in media outlets or blogs. Independent recognition adds significant weight to your reputation.
Call to Action
A well-crafted call-to-action (CTA) doesn’t have to push hard to be effective. Our approach at Omni Online Strategies emphasizes starting with a soft CTA-an invitation that’s easier for the recipient to respond to and builds engagement naturally. Here’s why soft CTAs work so well:
Reasons for using soft CTAs:
Psychologically easier to digest: A soft CTA feels conversational, making it less intimidating and more approachable for the recipient. For example, “Would you like me to send over some additional details?” is far more inviting than “Sign up now.”
Encourages action without pressure: Soft CTAs ask the recipient to take a low-commitment step, like requesting more information or expressing interest. This makes it easier for them to say yes.
Improves sender reputation: Any reply, even a negative one, helps your sender reputation by signaling to email service providers that your emails are engaging and relevant.
Starts a natural discourse: A positive reply, such as “Sure, please send more info,” initiates a conversation. When the dialogue develops naturally, it builds a stronger connection and lays the groundwork for a more meaningful interaction.
Soft CTAs don’t just boost response rates—they create an open, low-pressure environment that fosters trust and encourages prospects to engage. Once the conversation begins, transitioning to a stronger CTA feels effortless and aligned with the recipient’s comfort level. This approach ensures your outreach is both effective and respectful.
From Cold to Warm email & Sales Piplines
A successful cold email campaign doesn’t stop at generating engagement—it evolves based on the recipient’s actions, moving them through a carefully structured process toward conversion. Understanding how to transition from cold outreach to warmer sequences and, eventually, direct sales engagement is critical for maximizing the value of your leads.
Warm Leads vs. Cold Leads
A warm lead is someone who has shown clear engagement, such as replying to an email, downloading a resource, or clicking on a link. These leads require a shift in strategy. They should be transitioned into a more targeted, warmer drip sequence with heavier CTAs, such as scheduling a call, attending a demo, or exploring pricing options.
Cold leads, on the other hand, require more patience. They should remain in sequences with softer CTAs to keep the interaction low-pressure and prevent overwhelming them. The goal is to maintain relevance and nurture them until they’re ready to take the next step.
Defining a Process for Warm Leads
Once a lead is identified as warm, a clear follow-up process is essential to maintain momentum. Consider the following steps:
Managing Handoffs to Sales:
Warm leads should be passed to the sales team promptly, with clear instructions on how to engage them effectively.
Providing Lead Interaction Summaries:
Sales reps should receive a detailed summary of the lead’s interactions, including emails opened, links clicked, and resources downloaded. This context allows for more personalized and relevant conversations.
Ensuring Timely Follow-Up:
Set defined timeframes for follow-up actions to keep the lead engaged. Delayed responses can lead to lost opportunities, so automation tools and reminders can help ensure no lead is overlooked.
Integrating Other Channels
Once a lead becomes warm, email alone may not be enough. Integrating additional channels like SMS, calls, and even direct mail can strengthen your engagement:
SMS: Use for reminders, quick updates, or scheduling confirmations.
Calls: Ideal for high-value prospects or when a more personal touch is needed.
Landing Pages: Direct warm leads to highly targeted pages that align with their interests and next steps.
Tracking Metrics and Adjusting Strategy
To optimize your campaign, regularly measure and refine its performance. Key metrics to track include:
Open rates, click-through rates, and reply rates for cold sequences.
Conversion rates, call bookings, and sales outcomes for warmer sequences.


