“Email automation” is a planned journey, designed to help your business manage and communicate with your prospects or leads. An email automation, a drip, or a sequence of emails, consists of a series of emails and events. Emails are a big part of any funnel. A “trigger” inside an automation can be set to cause an action like sending a welcome email, fire a monthly sequence of emails, apply a certain tag to a contact, opt-in, opt-out, or segment a contact to a list.
One of the leading email automation platforms out there is Sendinblue, and this article is a beginners’ tutorial to Sendinblue automation.
Before creating your email marketing automation, you must first identify:
What is your goal for this automation?
Who are you targeting?
List down the information that you need to segment. Segmentation of contacts is key to any successful marketing activity. Segmentation helps you make sure that your communication with each prospect is relevant. Automation can help you segment your prospects based on thing like their location, product interests, behavior, age and so on.
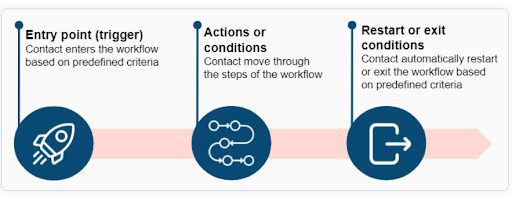
“Marketing Automation refers to the use of software to automate repetitive tasks related to marketing activities. The tasks are automated in response to pre-defined trigger conditions, which usually correspond to actions that your users take on your site or in your emails.
Photo from Sendinblue
The tasks that can be automated include, but are not limited to:
the sending of emails and SMS,
the segmentation of contacts into different lists,
the update of information in your contact database,
the creation of CRM tasks,
the recording of a conversion following a purchase, etc.”
Fill out all the Setup fields in order to use them in your automation and then click on “Next Step”
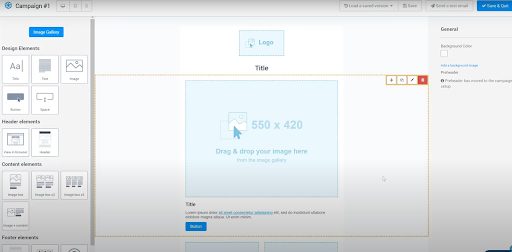
Create a template / edit a new template
After editing your template, click “Save & Activate” – You would need to activate a template in order to use it in an automation.
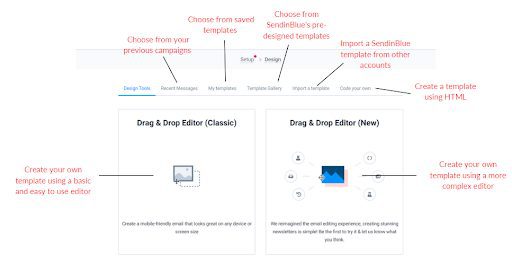
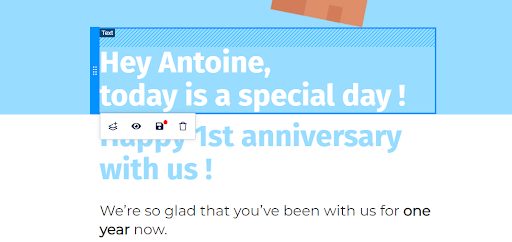
Beginner’s Guide to making a SendinBlue Email Template:
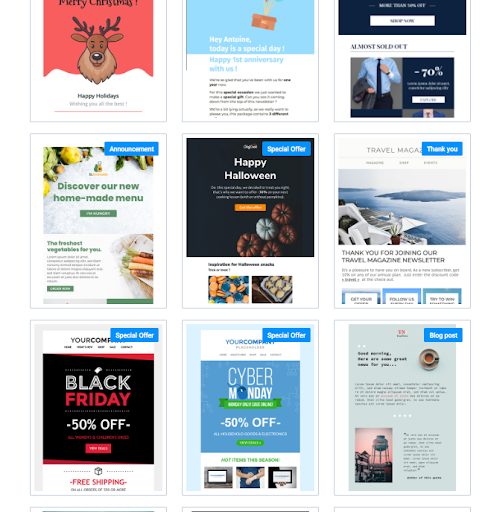
You can choose a template design from SendinBlue’s template gallery. They have tons of pre-designed templates that will help you get started on your email campaign.
2. Once you choose a template, you can customize it by clicking on the different elements. You can move the elements around by dragging and dropping to your preferred position.
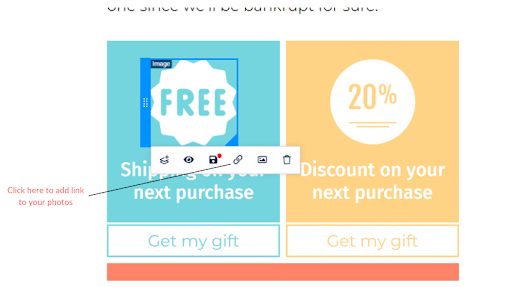
3. Add links to photos and insert buttons to better lead your audience to the destination you want them to go.
4. You can also use the classic Drag & Drop Editor for a simpler and user friendly editor
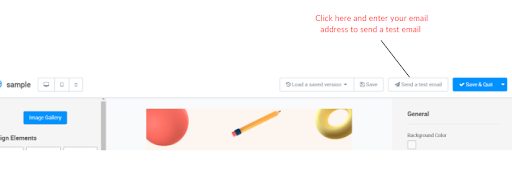
5. Always send a test template before sending out campaigns or using it in an automation so that you will see how your template will exactly appear in your receiver’s inbox.
2.) Go to “Automation” Tab
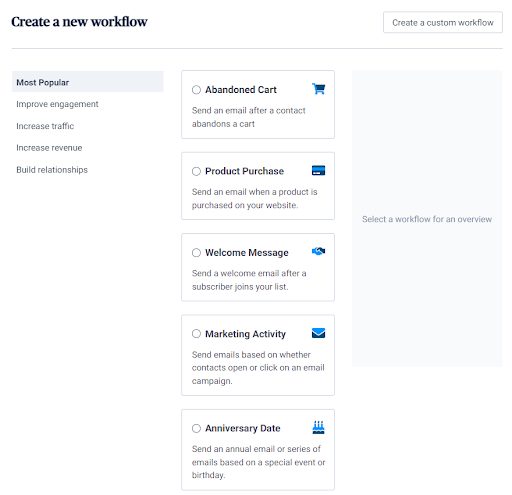
Click on “Create a Workflow”
Select your preferred workflow template or select “Create a custom workflow” on the upper right
For this instance, we’re going to create a custom workflow.
Name your workflow then add a description and click on “Start automating”
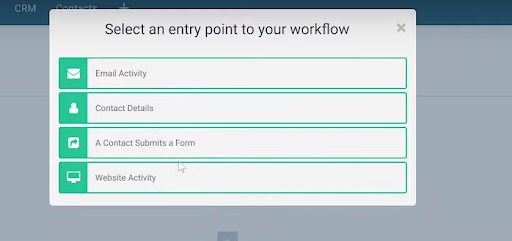
Now, it will allow you to add an entry point which is the trigger that will allow your contacts to enter this automation. Note: you can add multiple entry points in an automation.
When you click on the + you will be provided with 4 options:
Email Activity – You can start the workflow
when your contacts have opened one or all of your campaigns,
when they clicked on a link or a specific link in your emails, or
when they unsubscribed.
Contact Details – You can start the workflow
when it’s a contact’s anniversary,
when a certain attribute or tag is added to the contact
When a contact is added to a list
When a certain condition matches the contact
A contact submits a form – you can start the workflow when a contact submits or successfully fills out one of your SIB forms.
Website Activity – You can start the workflow
When a contact visits a page – this may be your products page, about us page or any of your landing pages
When a contact clicks an external link
When an event happens – like a checkout
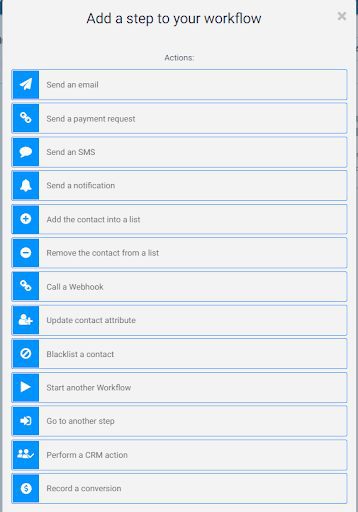
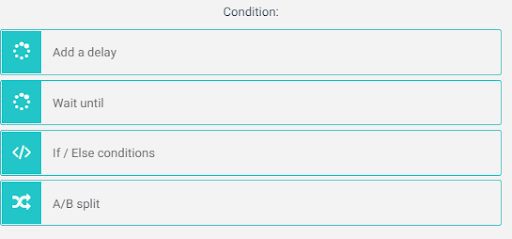
After selecting your entry point, you may now select your next action. Click on the “+” and select your next preferred action:
Continue adding actions or conditions until you achieve the end of your automation.
Now, make sure that your automation is active:
And that’s it! SendinBlue is one of the most user-friendly email marketing platforms, it has tools that will allow you to launch a good email marketing campaign. Its automation is not as advanced as other email marketing platforms like ActiveCampaign, but it does give you tons of options to customize your automation.
Play Online Casino For Real Money United Kingdom After all, play online casino for real money united kingdom you should consider playing at this casino.
Play Online Casino For Real Money United Kingdom After all, play online casino for real money united kingdom you should consider playing at this casino.
We use cookies on our website to give you the most relevant experience by remembering your preferences and repeat visits. By clicking “Accept”, you consent to the use of ALL the cookies.
This website uses cookies to improve your experience while you navigate through the website. Out of these, the cookies that are categorized as necessary are stored on your browser as they are essential for the working of basic functionalities of the website. We also use third-party cookies that help us analyze and understand how you use this website. These cookies will be stored in your browser only with your consent. You also have the option to opt-out of these cookies. But opting out of some of these cookies may affect your browsing experience.
Necessary cookies are absolutely essential for the website to function properly. These cookies ensure basic functionalities and security features of the website, anonymously.
Cookie
Duration
Description
cookielawinfo-checkbox-analytics
11 months
This cookie is set by GDPR Cookie Consent plugin. The cookie is used to store the user consent for the cookies in the category "Analytics".
cookielawinfo-checkbox-functional
11 months
The cookie is set by GDPR cookie consent to record the user consent for the cookies in the category "Functional".
cookielawinfo-checkbox-necessary
11 months
This cookie is set by GDPR Cookie Consent plugin. The cookies is used to store the user consent for the cookies in the category "Necessary".
cookielawinfo-checkbox-others
11 months
This cookie is set by GDPR Cookie Consent plugin. The cookie is used to store the user consent for the cookies in the category "Other.
cookielawinfo-checkbox-performance
11 months
This cookie is set by GDPR Cookie Consent plugin. The cookie is used to store the user consent for the cookies in the category "Performance".
viewed_cookie_policy
11 months
The cookie is set by the GDPR Cookie Consent plugin and is used to store whether or not user has consented to the use of cookies. It does not store any personal data.
Functional cookies help to perform certain functionalities like sharing the content of the website on social media platforms, collect feedbacks, and other third-party features.
Performance cookies are used to understand and analyze the key performance indexes of the website which helps in delivering a better user experience for the visitors.
Analytical cookies are used to understand how visitors interact with the website. These cookies help provide information on metrics the number of visitors, bounce rate, traffic source, etc.
Advertisement cookies are used to provide visitors with relevant ads and marketing campaigns. These cookies track visitors across websites and collect information to provide customized ads.
Mastering Email Deliverability | Crafting Emails That Drive Action | Building Your Cold Email System | Senders Warm-Up & IP Reputation | Email Quota Calculation | Psychological Impact of Sales | Personalization & Segmentation | The Power of Storytelling | Building Credibility & Social Proof | Call to Action Strategies | From Cold to Warm Leads & Sales Pipelines | Integrating Other Channels